These days, the vast majority of recording and music production is done using computers – and why not? Despite a growing consensus that analogue yields a more natural, authentic, and somewhat magical tone, it is undeniable that the digital world has brought along a wealth of benefits that means that artists can craft hits in their bedrooms with a laptop, an interface and a microphone. But once you have these things, you have an important decision to make. Which DAW will you use? Let’s take a look at what a DAW is, and compare two of the big ones – including what they do and which is the best. Let the battle of Ableton vs Logic Pro X begin!
Comparing DAWs
Your Digital Audio Workstation (DAW) is basically your recording software and will be the canvas for your creations. This is what you will create your music using, and it is the software and home of your new creations. For this reason, it is incredibly important to understand the kind of DAW will suit you best and help you realise the sounds in your head.
In this article, I will compare two of the big hitters and industry standards in the DAW game: Apple’s Logic Pro X vs Ableton Live. There are a number of different variations of Ableton DAWs, so for the avoidance of doubt, I am using Ableton Live 10 Lite. Although, you can also see a review of Ableton Live 10 Standard on our blog.
Ableton Live come in different degrees called Intro, Standard and Suite. It is worth heading to their website to get a sense of what is available in each version. In terms of hardware, I use an iMac and my interface is a Focusrite 18i20 rack unit.
Ableton is generally known for its flexibility and application in a live context. Whereas Logic Pro X is positioned more as a studio engine alternative to Pro-Tools. That said, Ableton is keen to emphasise that their product can be used effectively in the studio as well as live. So, let’s see how they compare and which comes out as the best DAW!
Ableton Vs Logic First Glance: The Interface
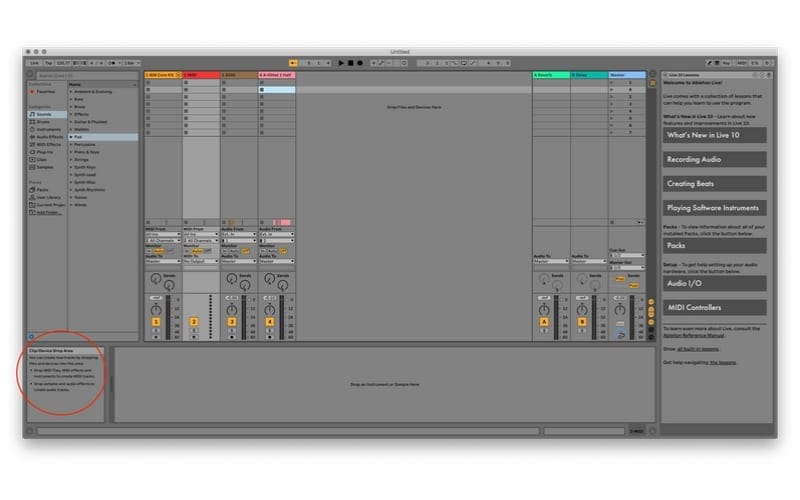
Opening any new software can be a daunting experience. When it comes to something as complex as a DAW, it is a totally new world! In Ableton, the first thing to highlight is the Info View, in the bottom left-hand corner of the window.
This helpfully explains whatever your mouse happens to be hovering over.
Logic has a similar feature where you can click the Quick Help button, and anything you hover over will also have a definition pop up.
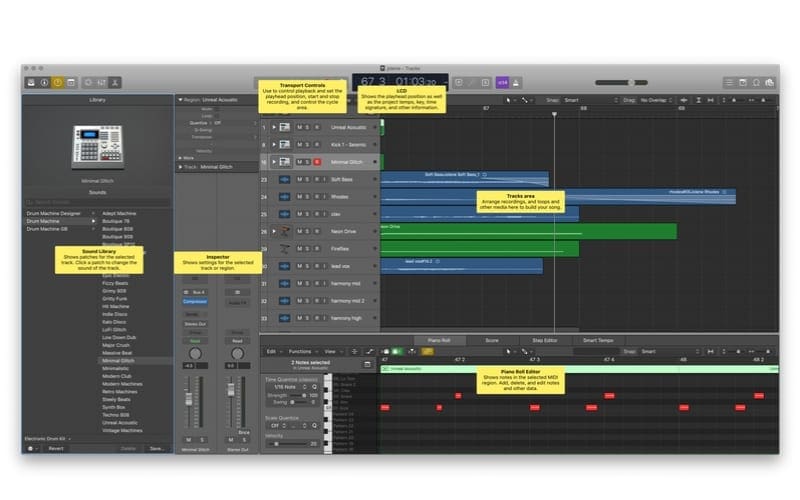
When it comes to layout, both Logic and Ableton are built on similar foundations, but with a few key differences.
In both DAWs, your library can be found on the left-hand pane. This is where you will find your MIDI Voices and, in the case of Ableton, your samples, loops, etc.
For Logic, these things can be found on the right-hand side but are hidden in the default view. So, you need to click the Loop or Files button in the top right-hand corner to make the appropriate right-hand pane appear. The central pane is the main workspace, and both software follows the same principle of displaying audio as blocks that can then be arranged in sequence. Both also feature a ‘Playhead’ (a vertical line running down the screen) that moves from left to right as the track is played. The normal Play, Stop, Record buttons and BPM and other project info are along the top of the window.
Ableton Vs Logic Layout: Main Window
So, now we move on to the DAW’s layout!
Ableton
In this DAW, there are two options when it comes to the view in the main window: Arrangement and Session. By toggling the two icons represented by 3 lines in the top right-hand corner (or by pressing the Tab key on the keyboard if you like your shortcuts), you can choose which view you would like:
- Arrangement displays the familiar blocks of audio arranged horizontally.
- The session shows you what I would call a mixer view, where you can view and adjust your levels, panning, plugins, etc. In the very bottom pane, you have your plugin and audio configurations. You can also mix from the Arrangement view, too.
Logic
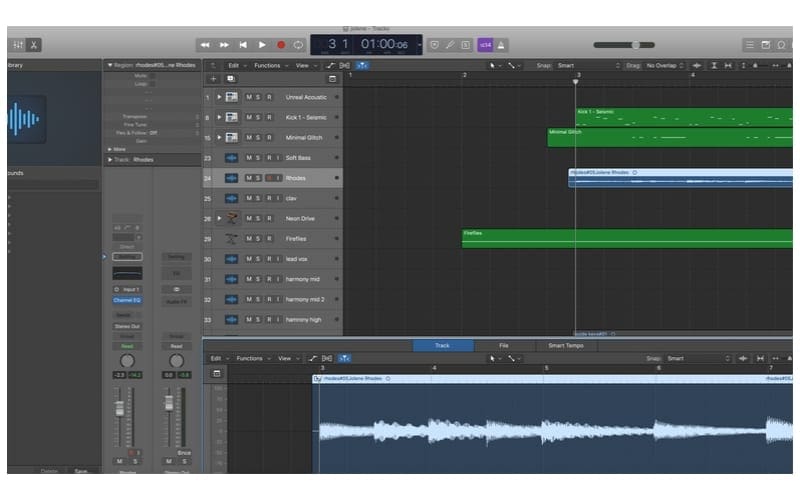
By contrast, in Logic, the horizontal audio sequence display is always in the central pane, and the mixer is viewed in the bottom pane. This bottom pane can be toggled between.
- Mixer
- Editor (where you can view the audio wave and make more granular changes/key in MIDI information)
- Smart Controls (bass, mid, treble, LFO, etc.) for editing the patch output
For me, Logic has a much clearer layout in that you always have the horizontal sequencer view as your main window. This clearly shows where you are in a recording, what’s been and what’s coming up.
I also find the graphic layout of Ableton to be much less pleasing to the eye. What really matters is the audio results, but I do think that when you are staring at a screen for hours during a project, it certainly helps if the text is clear and easy to use. In Logic, you can even add little graphics to your tracks so you can see what they are quickly and easily.
Using The Software
With Ableton, you have to wrap your head around the Arrangement vs Session view, and how they each behave. One great thing about the Session view is that you can set it up so that you can key in your notes.
Ableton VS Logic Pro X
Whatever notes you key in will automatically be repeated in the same way as a loop pedal might work. Live Performance is really where Ableton comes into its own, and this automatic Loop can be a really powerful tool. I can also see the practical application of this from a songwriting point of view. A few clicks can set you up with a drumbeat for as long as you need.
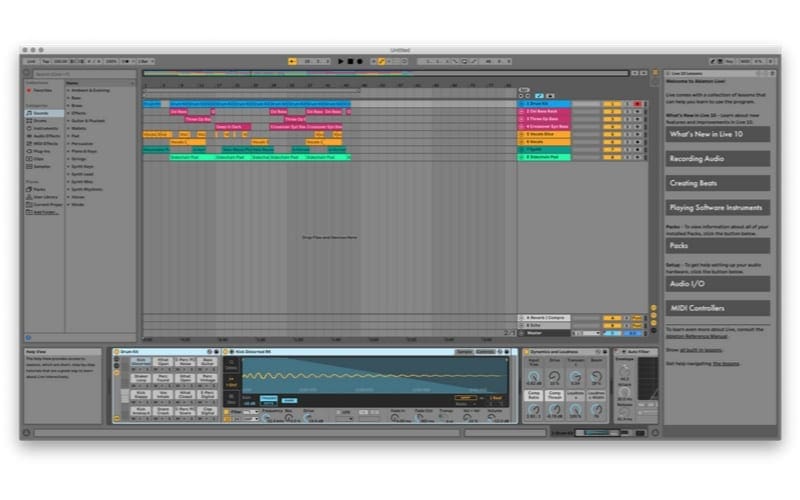
To set this up, you drag the MIDI sound you would like from the Library onto your track in the sessions view. You can also drag effects such as delay and other voices onto the track.
By double-clicking, you bring up a keyboard in the bottom window that allows you to pencil in notes as you go. Ableton will automatically look when you hit the play button at the top of the track.
Effects
One thing I like here is that the effects and sound parameters are laid out for you at the bottom. This means you can see in one glance the different things you have going on.
Ableton VS Logic Pro X
Logic (Pro X) is not specifically designed for live performance (if that’s your bag, then I’d recommend checking out MainStage 3!) You can loop, of course, but you need to specify what regions you would like to loop. That makes it a bit more manual and it wouldn’t fit a live context.
For adding effects, I think that the Logic method makes more sense. With the Mixer window at the bottom, you can literally choose from hundreds of different effects and then tweak them.
What I really like about this is that it clearly lists the effects you have on each track. Plus, you can open up the individual effects windows to change the parameters (with multiple windows easily workable) if you want to see how effects play off each other.
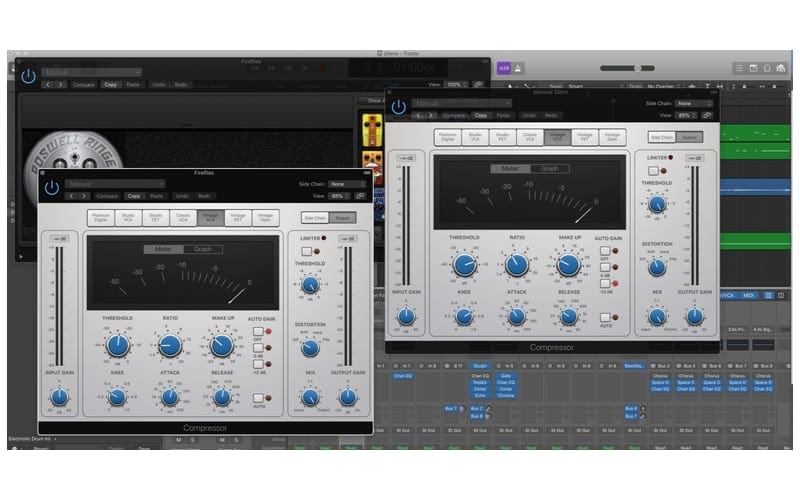
Actually editing the audio is a lot easier in Logic (Pro X). By just double-clicking on an audio file, you open the editor window, where you can cut, fade, slow down and pretty much anything else you can think of. This even goes down to editing individual waveforms. In Ableton, editing with this level of granularity is much more difficult.
Making Beats
One area where Ableton really shows its worth is in making beats. Logic is perfect for songwriters in that it has digital “Drummers” who can provide a natural feeling drum beat for you to play along to.
Logic can even provide a click track based on your input from you playing an instrument, even if you push and pull the tempo. Of course, you can also design your own beats using MIDI. It is, however, quite a granular process – digging into the MIDI voice with a Pencil tool and indicating exactly where you want your beats to land.
With Ableton, there are a ton of pre-populated individual drum hits, cymbal smashes and shuffles for you to drop into any order to create something unique. Plus, the easy snap feature means that you can easily drag and drop beats to really build your track. Ableton also has free sound packs! Again, the automatic loop becomes a really useful feature in this process.
One limitation specifically of Ableton Live Lite is that you are limited to 8 MIDI or Audio tracks. So if you need to create more complex masterpieces, you will probably need to look at upgrading, which also unlocks a wider array of other features and plugins.
Plugins
The key to any DAW is Plugins! Your plugins are effects that you can add to your tracks to manipulate the audio. From delay and reverb to compression, distortion, EQ, Phaser, Chorus, Flanger, and more. These are really what transform your raw audio into something that sounds palatable.
One of Logic’s main selling points is the number of plugins that come with it as standard. There are literally hundreds of native Plug-Ins and of course, you can buy more (VST plugins).
Ableton also comes with a really good number of plugins. It doesn’t have quite as many as Logic, but certainly, has enough to get playing with and make some interesting sounds.
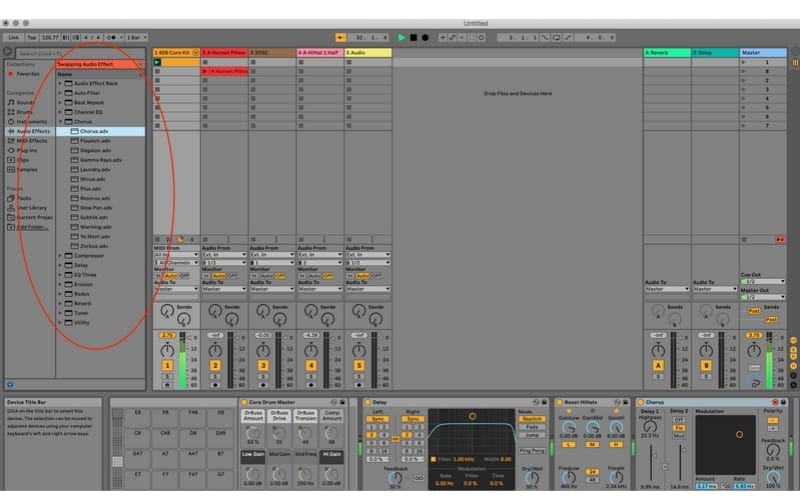
Both software includes some nice presets to their plugins if you’re not 100% sure of what you’re doing. For me, the way Logic presents its presets is much easier. You open up the plugin in question and choose from a dropdown menu. Whereas with Ableton, you need to select from a library and then drag the preset onto your track. This is fine, but with Logic, the route back to where you started is clearly visible with a “Recall Default” option, which is always present.
However, with Ableton, you have to manually switch the effect off, or press the “Hot Swap Preset” icon. You then must choose another from a separate list in the library, rather than having it in one place.
Mixing
Mixing in Logic (Pro X) is a dream. You can either run your mixer as the window beneath your main project view or have it as a separate window. This is particularly nice if you have a second screen. That way, you can mix while also maintaining an overview of what is coming up. This, in turn, gives you the ability to see how that will affect your mixing decisions. Creating new buses is really straightforward, and the layout of the mixer is very familiar. But it also has the added benefit of easily and clearly displaying the plugins on each track.
In Ableton, it feels a little awkward mixing without an overview of the whole project and what’s coming up. However, this is very much a luxury of the digital world, and something that is not present in analogue systems. It may be that Ableton decided to make these views interchangeable rather than visible in parallel based on this principle.
Ableton Vs Logic: Availability & Pricing
One great thing about Ableton is that Lite versions of the software usually come free of charge with certain hardware. Focusrite and Novation products also often include a license for Ableton Live Lite. So, it can be a great software to get started with if you are purchasing MIDI keyboards or audio interfaces.
Ableton can be used on Mac or PC and comes in three main versions – Intro, Standard and Suite. For Live, the Intro license is £69, Standard is £319 and Suite is £539.
Ableton has also released its own MIDI controller called the Push. The Push is the first pad-based controller that embraces scales and melody. Push is powered by Live and costs £599 for Intro, £848 for Standard and £1048 to use with Suite. Each of includes Ableton Live 10 (at differing levels, as with the usual versions), plus the Push.
Logic Pro X is only available for Mac and can be downloaded from the App Store for £199.99.
Ableton Vs Logic: Winner, Winner, Chicken Dinner
For me, Logic Pro X is the clear winner and best DAW between the two, regardless of genre. It is beautifully laid out, powerful, and sounds great. It really is a professional-grade DAW that makes creativity easy and fun.
In regards to what is the best DAW for beginners, Garageband is included free with any Mac. Also, learning to it as a precursor will make Logic feel like an easy step up when you come to invest in a DAW. It seems obvious to me that Logic Pro X is the best DAW for Mac, even if it isn’t the best overall.
Ableton does have some nice features, however! Plus, the fact that it comes free with certain hardware and is also available on PC means that if budget is a factor, you can get started for less. However, I feel this is a bit of a false economy given the limitations of the lower editions. In my opinion, the complexity of the pricing model is bordering on ridiculous. Especially when compared to Apple’s easy one-price-for-everything approach.
Ableton VS Logic Pro – Conclusion

To summarise, in our Logic Pro vs Ableton debate, I will say that there are pros and cons to both of these DAWs. Some issues might be a deal breaker for some, for others, they might be barely noticeable. Our personal recommendation for ease of use and layout is Logic Pro X, but when it comes to Live versus the Studio – Ableton is better than Logic DAW. Let us know if you agree with us, and if not – why? You can search for BPM to understand more by using the BPM Tapper tool on Music Gateway. Try it today.


